|
It’s been a little while, but don’t worry – we’re still here (whether you like it or not)! We hope everyone had a safe and happy Thanksgiving, despite how different it may have been this year. Our Thanksgivings were filled with lots of Zoom calls, but there was thankfully still plenty of food involved. Anyways, we have been hard at work on both the digital and physical side of The Stifling Dark since our last update. I’ll cover off more on the development/digital side of things in our next update, but for now I wanted to focus on the process of physical prototyping that we’ve started now that the components for the game are fairly solidified. To clarify, I’m not talking about the very first prototype most developers do, which usually consists of a combination of Monopoly money, Carcassonne meeples, and various sheets of paper and cardboard. I’m talking about the more refined prototypes that are usually created once you’re farther along in development and have a good idea of what your game is going to look like. 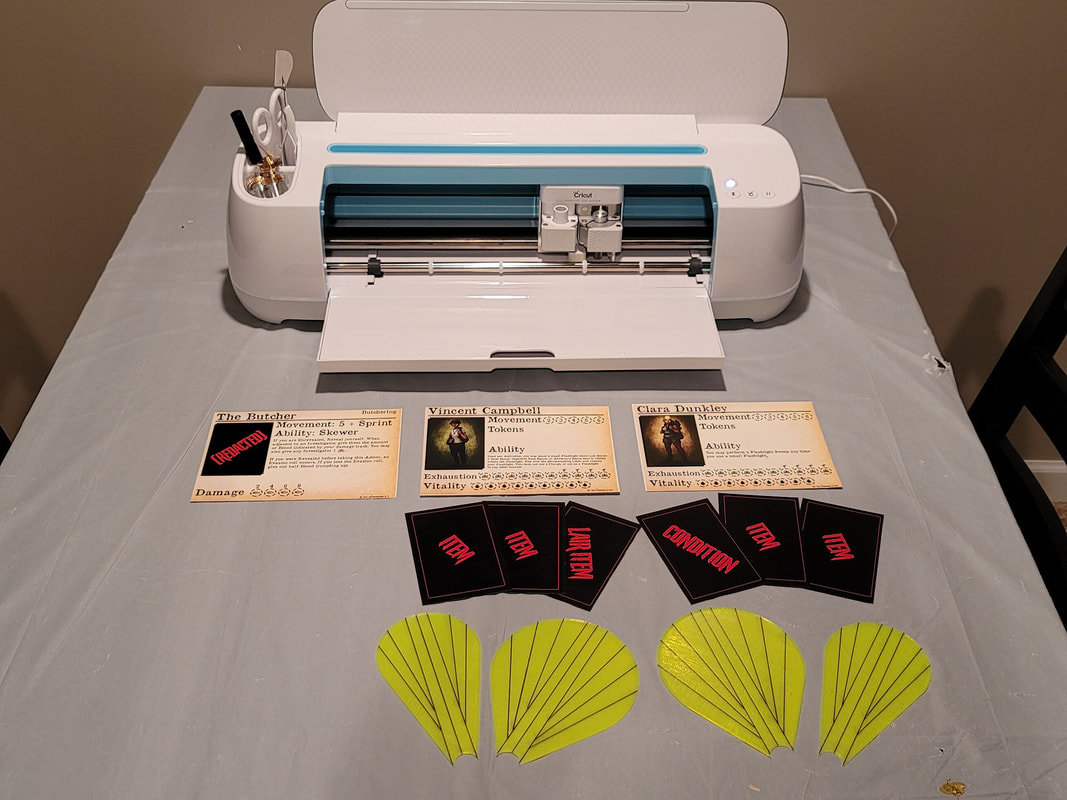 Due to COVID-19 we haven’t had a chance to get together and physically play the game, but we decided it was time to get a physical prototype created to test out the gameplay in real life instead of in Tabletop Simulator. We’re not quite ready to order a prototype from an actual manufacturer, although we are in the process of getting prototypes of the flashlights since those are an integral part of our game and we want to ensure we go with a manufacturer that can do them justice. The good news is that I have an excessive amount of “toys”, including a 3D printer (a slightly modified Ender 3 for those that are wondering), a Cricut Maker, and a color laser printer among other things. I’m also very thankful that Reddit, the Board Game Geek (BGG) forums, and other online resources have plenty of tutorials on the best way to do this. 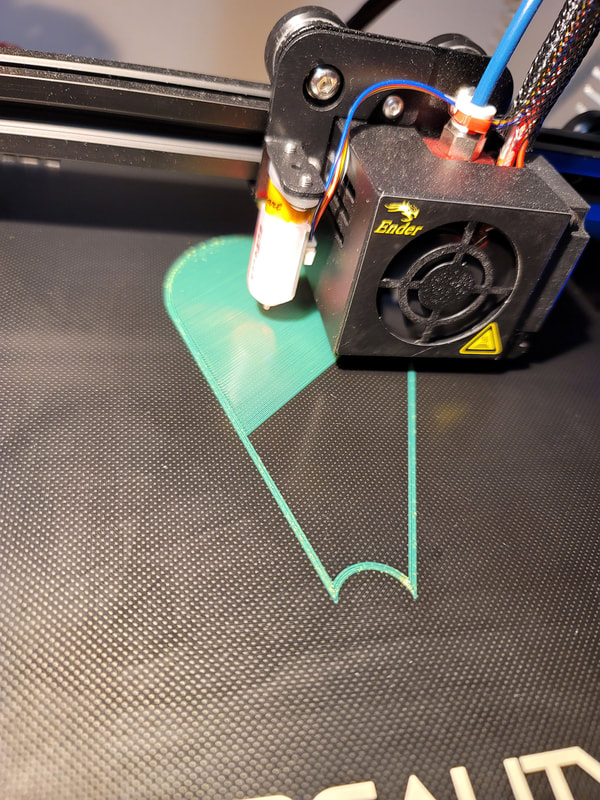 As previously mentioned, the flashlights are one of the central components in our game so we wanted to test out the mechanic on a real table (as opposed to the simulated variety). It took a little while to find a relatively well-rated translucent filament, but the one I got ended up working well aside from being very brittle and breaking while just sitting there. Each small flashlight takes around 45 minutes to print, and each big flashlight takes about an hour and a half. We wanted to create 5 prototypes, so that meant printing 20 of each flashlight. Once they were printed, I had to manually draw the lines on them using a template, a ruler, and a Sharpie. In hindsight, I should’ve just 3D printed a template with the lines cut out, placed it over the top of each flashlight, and spray painted it. Oh well, now I know for next time! 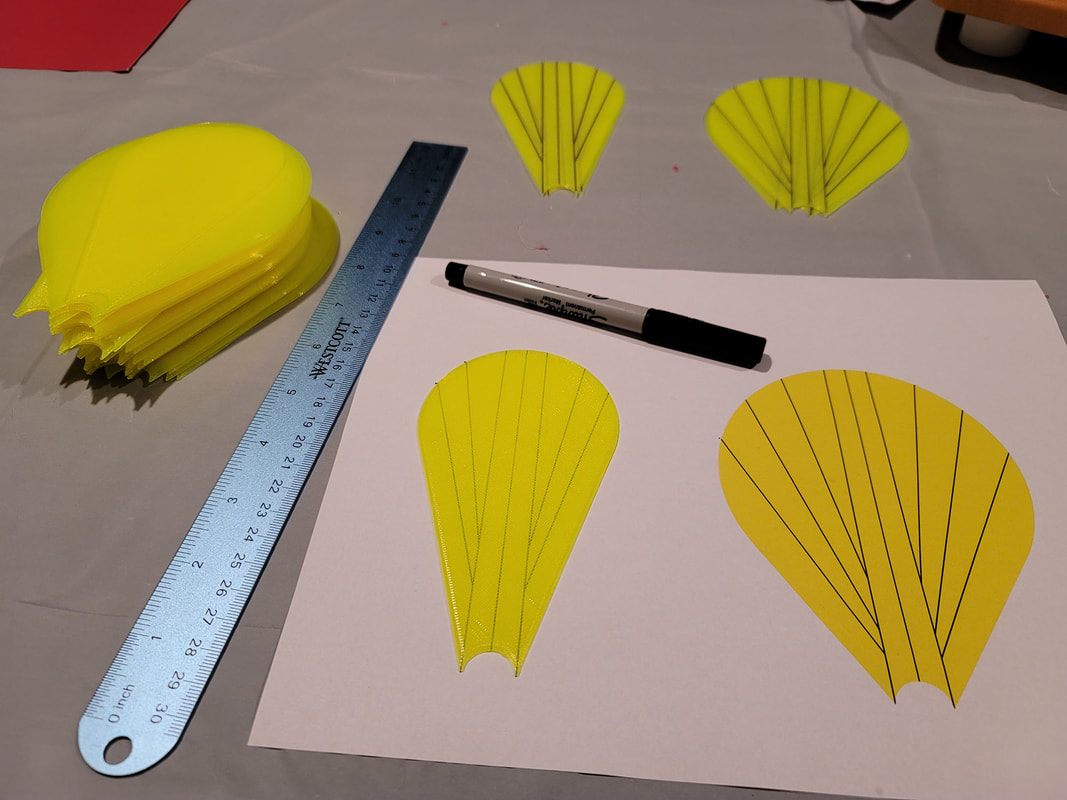 The next step from there was a bit easier (or so I thought). I needed to print out the cards and player boards, so I found a good tutorial on the BGG forums and rolled with it. The short story is that you print the fronts and backs on pieces of 32# cardstock, use spray adhesive to seal them together, and then cut them out with either a Cricut or a good old-fashioned paper cutter. Optionally, you can use thinner paper and put a laminating pouch in the middle to make the cards snap a bit better while shuffling. Seems simple enough, but a couple issues I ran into included forgetting to mirror the layouts, not lining the front and back up perfectly while adhering them, and failing to cut them out straight on either the Cricut or the guillotine cutter. The first issue was easy to solve by paying more attention, the second one involved creating a jig of sorts to force the paper to line up when adhering, and the third one required some creative workarounds to force Cricut Design Space to do what I wanted it to do. 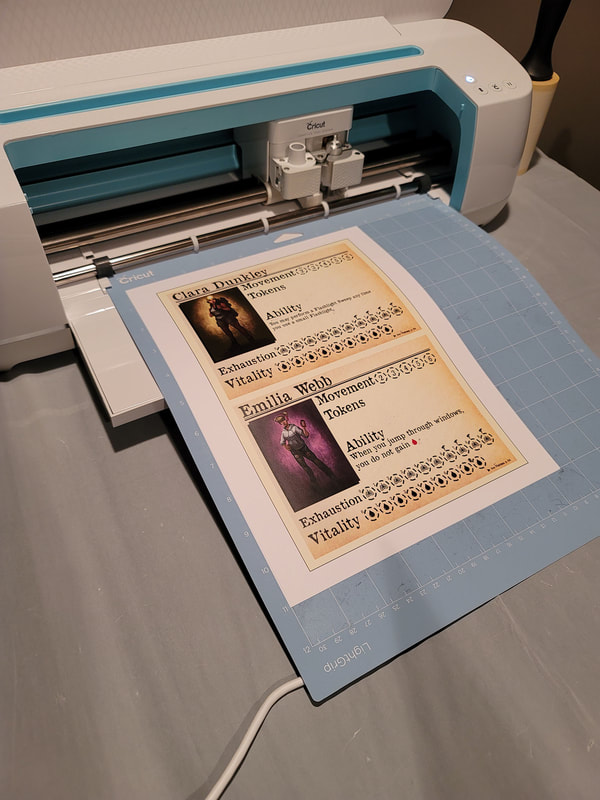 Of course I saved the “best” part for last – the game board and the tokens. Both of them are bigger than a single sheet of paper, so the plan is to cut the images up into smaller sizes so that I can print them out. The downside of that is I will have that many more things to line up correctly before cutting.
The punch boards are going to be especially daunting, as we have almost 150 tokens in the game at the moment. We’re going to try two approaches to cutting those out – one with the Cricut and one with a 15mm hole punch that Matt recently acquired. Matt’s hole punch will likely end up being more accurate, but it also has a 100% chance of causing sore hands by the end of the process. Hopefully we’ll have a fully completed prototype ready by the time our next update rolls around, but I’m not going to make any promises because the game board and punch board are going to be quite the undertaking. Wish me luck! Jeremy
0 Comments
I’m switching things up a bit with this post, as I’m going to be talking about the broader game industry / game design as opposed to our specific game. Well that… and this one is a bit longer and doesn’t have any pictures. Sorry in advance! Anyways, there are two primary things we want to accomplish with our blog – the first is to educate fans about our game, and the second is to educate other developers about the board game industry.
Before I say anything else, I want to share an important disclaimer – I AM NOT AN EXPERT. I’m going to be talking about my personal experiences in these areas, and you should not take my advice as the absolute truth, nor should you go out and spend a bunch of money creating a game without doing additional research. This is intended to be a resource, not an insanely thorough end-to-end guide for designing a board game. Now that that’s out of the way, if you’ve been following our posts you will have realized the first few posts were all focused on our game. I think it’s about time we give the second category some love. The reason that second category is so important is that we want to give back to the community – we couldn’t have done even half of what we’ve done so far without the amazing resources that are out there. I’d be remiss if I didn’t mention Jamey Stegmaier or James Mathe, who created two of the top resources that we have been referencing throughout our journey. James unfortunately passed away a little over a year ago, but the articles he has written and advice he has shared will live on forever. I can only hope our blog can help even a fraction of the people that James and Jamey have helped. OK, now it’s time to get down to business. As obvious as it is, it’s worth mentioning that the manufacturer you choose is perhaps one of the most important (and expensive) decisions you will make while designing a board game. If you choose poorly, you could not only lose out on a ton of money but also severely affect your future in the board game industry (if you still have enough money left to give it another shot, that is). In my mind, a good manufacturer is much more than just the one with the best price. Sure, lower costs are great, but what’s the payoff? Perhaps the most important thing to consider is how they treat their workers. This may be something that is hard to see on the surface, but if you do enough digging or ask enough questions you’ll eventually get some answers. Thankfully it seems like this issue is starting to gain more visibility, but it is unfortunately still an issue in many countries. Another oft-overlooked attribute is customer service. Responding to emails in a timely manner is one thing, but actually reading your emails (as opposed to “reading” them), answering your questions, and providing advice is an entirely different thing. To some manufacturers, you may just be another overzealous designer whose games will never see the light of day. To others, you may be a valuable customer no matter how big or small your game gets. You should also consider looking at what games each manufacturer has produced. Many game manufacturers proudly display the games they have manufactured right on their website, so if you are familiar with any of the games you can easily check the quality and use that as a reference point when communicating with the manufacturer. Other companies have zero mention of what games they’ve produced so you’ll have to do some digging. If you still can’t find anything, you can always contact them and ask. Alternatively, you can grab one of your favorite games and check the box or credits to see who manufactured it! Make sure you also check the reviews of potential manufacturers. Don’t just go with someone because they’re cheap, the quality looks good, or they made a game you like. Read up on forums and blogs to see what other people’s experiences have been like. A day or two worth of searching can save you months (and possibly years) of headaches later on. Lastly, there are the more tactical things to consider: minimum order quantity (MOQ), lead time, and manufacturing country. MOQs are an important deciding factor depending on how many copies you plan to produce. If you’re planning on producing tens of thousands of games this will be a non-issue for you, but if your game is going to have a limited run or is for a more niche market you’ll need to pay attention to each manufacturer’s MOQ. Note that there can be MOQs both for the total number of games as well as for individual components, so make sure you ask about both. On the flip-side of MOQs are potential capacity constraints. This is a much less common issue than not being able to hit an MOQ, but there are cases where a given manufacturer either has too many projects going on or can’t support the number of units the designer wants to create. Make sure you’re up front about timing and quantity to avoid any potential issues down the road. If you are in a time crunch, you’ll need to put much more emphasis on the lead time. There are multiple different lead times to consider, but the manufacturing and shipping processes will be two of the longest. Lead times are the amount of time it will take the manufacturer to sign off on your artwork and files, create a prototype and send it to you, and then manufacture and ship your game (among other things). The lead time is largely determined by the country where the manufacturer actually does the manufacturing. Just because a manufacturer has an office in the US does not mean that they manufacture their games in the US. If they do, you’ll have significantly lower lead times (assuming you are shipping to the US) but you’ll generally pay a premium as a result. Before I close it out, I wanted to mention that this post has largely focused on “standard” manufacturers. There are also print on demand (POD) manufacturers, which may be a better option depending on the type of game you are making (especially if it’s a card game). I’m not very well versed in them, but there are plenty of resources available online so I’d recommend checking those out to see if POD is the right way to go for your game. Hopefully this provided some useful tips for our fellow game developers, and remember that we will continue posting articles like this on a fairly regular basis going forward. If you have any questions feel free to post down in the comments and we’ll be happy to help you out! Sincerely, Jeremy |
 RSS Feed